
PHP max execution time determines how long a PHP script can run before the server stops it. Most hosting providers set this limit to 30–60 seconds by default. While sufficient for everyday tasks, it can cause issues with backups, large imports, or plugin updates. If exceeded, you’ll encounter a “Fatal Error: Maximum execution time exceeded” message, potentially disrupting your site.
To fix or adjust this, you can:
- Check your current limit: Use WordPress Site Health or
phpinfo(). - Increase the limit: Edit
.htaccess,php.ini, orwp-config.php, or use a plugin. - Recommended value: 300 seconds (5 minutes) for resource-heavy tasks.
- Troubleshooting tips: Update PHP, check server settings, or contact your hosting provider.
This guide explains why this limit matters, common causes of errors, and step-by-step solutions to adjust it. Properly managing this setting ensures smoother WordPress operation for tasks like updates, backups, and data imports.
4 Easy Ways To Increase PHP Execution Time In WordPress
Common Causes of Max Execution Time Errors
Understanding what triggers max execution time errors can help you avoid site disruptions. These errors typically stem from two main sources: resource-heavy WordPress operations and limitations within your hosting environment. Let’s break these down further.
Heavy WordPress Operations
Certain WordPress tasks – like updates, installations, and data imports – can take longer than expected to complete. Pratik Chaskar, CTO at Brainstorm Force, puts it plainly:
“Fatal Error Max Execution Time Exceeded is caused by a script within your website that didn’t complete within the PHP time limit”.
Tasks such as installing updates, importing large XML files, or restoring backups can easily surpass the default execution time limit. For instance, importing demo content or managing extensive WooCommerce catalogs can strain server resources. Similarly, backup and restore operations often involve heavy processing demands.
Database-related activities can also trigger these errors. If your site stores excessive data, operations like running complex MySQL queries, optimizing databases, or clearing thousands of post revisions and expired transients may exceed the time limit. Even media management tasks, such as uploading high-resolution videos or performing bulk image compression, can require significant processing time.
While these operations are a common cause, hosting restrictions can also play a big role.
Hosting Limitations
Your hosting environment often dictates how much execution time your scripts are allowed. This is especially true for shared hosting plans, where execution times are capped to ensure fair resource allocation among users.
As WP Astra explains:
“Web hosts need to maintain efficiency while allowing every website on each server access to shared resources. A PHP time limit is one way to achieve that”.
Even if you manually increase the PHP max_execution_time, certain server configurations – like those in Apache or Nginx – can override your settings. WordPress Developer Resources highlights this issue:
“If the request takes longer, it will be killed by the web server no matter your PHP timeout setting is”.
Additionally, managed WordPress hosting providers often enforce global server settings that ignore site-specific adjustments. In such cases, you may need to contact support to make any necessary changes.
These combined factors show why addressing PHP execution time limits is crucial for ensuring your site runs smoothly.
How to Check and Adjust PHP Max Execution Time
How to Check and Increase PHP Max Execution Time in WordPress
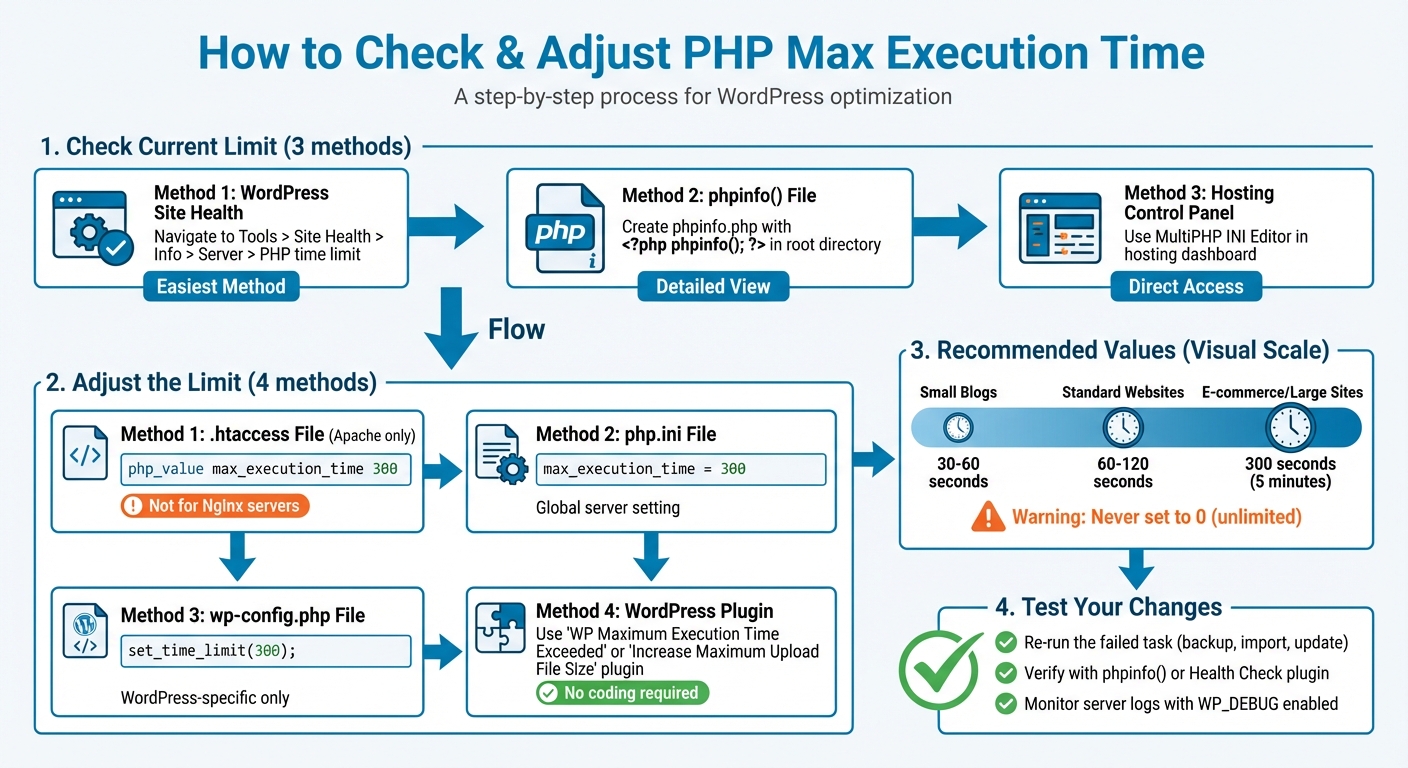
You can check your PHP max execution time directly in WordPress using the Site Health tool. Navigate to Tools > Site Health > Info > Server > PHP time limit to find this information.
For a deeper dive into server settings, you can create a phpinfo.php file containing <?php phpinfo(); ?> in your site’s root directory. Alternatively, use your hosting control panel’s MultiPHP INI Editor for detailed PHP settings .
Now, let’s explore how to adjust the PHP max execution time using different approaches.
How to Check Current PHP Max Execution Time
The quickest way to verify your current limit is through WordPress’ Site Health tool. If you prefer more detailed insights, the phpinfo() method provides a full breakdown of your PHP configuration via FTP. Hosting platforms like cPanel also offer the MultiPHP INI Editor to view and adjust PHP settings. Additionally, plugins like Health Check & Troubleshooting can display server environment details directly in your WordPress dashboard.
Adjusting Using .htaccess File
If you’re using an Apache server, the .htaccess file is a straightforward way to adjust the PHP max execution time. However, this method doesn’t work on Nginx servers. Before making changes, back up your site. Access the .htaccess file in your root directory (commonly public_html or www) via FTP or your hosting file manager, and add this line at the bottom:
php_value max_execution_time 300 This sets the limit to 300 seconds (5 minutes), which is generally sufficient for resource-intensive tasks like updates or imports. If you encounter a 500 error after saving, it means your server doesn’t support this directive – remove the line and try another method.
Editing php.ini or wp-config.php Files
To adjust PHP settings globally, locate the php.ini file in your site’s root directory. If it exists, find the line starting with max_execution_time and set its value to 300. If the file doesn’t exist, create a new php.ini file with the following content and upload it:
max_execution_time = 300 Some hosting providers require restarting or “killing” active PHP processes in the hosting panel for these changes to take effect.
Alternatively, you can modify the wp-config.php file to adjust the execution time specifically for WordPress. Access the file via FTP and add this line just before the comment that says, “/* That’s all, stop editing! Happy blogging. */”:
set_time_limit(300); This method applies only to your WordPress site, leaving global server settings untouched. As WPBeginner Editorial Staff explains:
“Increasing the maximum execution time will not slow down your website. This setting is a limit, not a target”.
If file edits feel intimidating, plugins offer a more user-friendly solution.
Using WordPress Plugins
For those uncomfortable with manual file edits, plugins provide an easier way to manage PHP max execution time. The WP Maximum Execution Time Exceeded plugin, for example, automatically updates your .htaccess file to set the limit to 300 seconds upon activation. Pratik Chaskar, CTO at Brainstorm Force, highlights its simplicity:
“The WP Maximum Execution Time Exceeded plugin means you don’t have to modify any of your files to fix the PHP time limit issue”.
Another popular option is the Increase Maximum Upload File Size | Increase Execution Time plugin, which has over 70,000 active installations. It allows you to adjust the time limit through a user-friendly interface under Media > Increase Upload Limit.
If a plugin causes a fatal error and locks you out of your site, WordPress 5.2+ includes Recovery Mode. You’ll receive an email with a link to deactivate the problematic plugin .
Keep in mind that shared hosting providers may enforce server-level restrictions that override your changes. If plugins don’t resolve the issue, contacting your hosting support team is the next best step.
sbb-itb-f80d703
Recommended Values and Best Practices
What Value Should You Set for Max Execution Time?
For WordPress tasks that demand a lot of resources, setting the max execution time to 300 seconds (5 minutes) is a good starting point. Smaller websites can often manage with a limit of 30–60 seconds. However, tasks like backups, bulk imports, or updates on larger sites usually require a higher threshold.
The ideal value largely depends on your site’s needs. For instance:
- Small blogs or standard websites: 30–60 seconds is typically sufficient.
- E-commerce sites or those with large databases: A range of 60–120 seconds is generally more appropriate.
Avoid setting the value to 0, as this allows scripts to run indefinitely, potentially overloading or crashing your server. Similarly, setting it excessively high (e.g., 1000 seconds) is risky. As the WebNots Editorial Staff cautions:
“Setting the value too high like 1000 seconds may potentially damage your server if there is a script running for such a long time.”
If tasks consistently exceed 300 seconds, the root cause might not be the execution time limit. It could be due to a poorly optimized plugin, theme, or even limited server resources. Instead of simply increasing the limit, consider identifying and addressing these issues or upgrading your hosting plan for a more reliable solution.
Once you’ve set an appropriate execution time, test your changes to ensure everything runs smoothly.
Testing and Monitoring After Changes
After updating your max execution time, re-run the task that failed earlier – whether it’s a backup, update, or data import – to confirm the new setting works. To verify your changes, use the phpinfo() function or install a plugin like Health Check & Troubleshooting.
For further monitoring, enable WP_DEBUG and review your server logs. This helps ensure scripts aren’t overloading CPU or memory resources. As WordPress Developer Resources explains:
“It’s a matter of balance between giving enough time for your scripts to be compiled and ensuring that you’re within normal server loads.”
If you’re on shared hosting, remember that your web server’s timeout settings (like those in Apache or Nginx) must match your PHP limit. If the server timeout is lower, it will terminate requests regardless of your PHP configuration. To avoid issues, it’s wise to test these changes in a staging environment before applying them to your live site.
Troubleshooting Persistent Execution Time Issues
Contacting Your Hosting Provider
If you’ve adjusted the execution time but errors persist, server-level restrictions imposed by your hosting provider might be the issue. This is especially true for shared hosting plans, where strict limits are in place to ensure one site doesn’t disrupt the entire server’s performance.
Before reaching out to support, gather key details like the error message, file path, and the activity that triggered the issue (e.g., importing a 50MB XML file or updating a WooCommerce database). When contacting your host, inquire about your current max_execution_time setting and request an increase to 300 seconds.
As Hafsa Tahir from Cloudways suggests:
“If you’re unsure about making the changes yourself, you can always reach out to the support team of your web hosting provider, show them the error that you saw, and ask them what your current execution limit is.”
Additionally, request server logs and ask if any security modules, like ModSecurity, are overriding local settings. If these adjustments don’t resolve the issue, the next step is to update your PHP version.
Updating PHP Version
Outdated PHP versions can lead to inefficient script execution and frequent timeouts. Upgrading to newer versions, such as PHP 8.1, 8.2, or 8.3, often results in faster script execution due to performance enhancements.
WordPress.org highlights this point:
“Your website may be faster because PHP becomes more efficient with each new version. Updating to WordPress’s recommended PHP version (currently 8.3 or higher) can deliver a performance increase.”
Most hosting control panels make it easy to switch PHP versions. Once you’ve upgraded, confirm the change by navigating to Tools > Site Health > Info > Server in your WordPress dashboard. Before making the switch live, test your theme and plugins in a staging environment to ensure compatibility. After updating PHP, double-check that your server settings are optimized for the new version.
Checking Related Server Settings
Execution errors can also stem from other server settings, such as the PHP memory_limit. If a script runs out of memory before reaching the timeout limit, it will crash. WordPress typically requires 64 MB to 128 MB of memory, while WooCommerce may need 128 MB to 256 MB. To increase memory, add this line to your wp-config.php file:
define( 'WP_MEMORY_LIMIT', '256M' ); Ensure that your web server’s timeout settings (e.g., Apache or Nginx) match your PHP timeout configuration. WordPress Developer Resources explains:
“It doesn’t make sense to have a very high script execution timeout on your PHP service, if the web server (e.g. Apache) timeout is lower than that – in such case, if the request takes longer, it will be killed by the web server no matter your PHP timeout setting is.”
To pinpoint the issue, try deactivating all plugins and switching to a default theme like Twenty Twenty-Five. If the problem resolves, reactivate plugins one by one to identify the source. Tools like Query Monitor can help you locate resource-intensive scripts or database queries. Additionally, an optimization plugin can clear out unnecessary database clutter, such as old post revisions and expired transients.
Conclusion
Managing your WordPress site’s performance during resource-heavy tasks is crucial for smooth operation. The PHP max execution time acts as a safeguard, preventing scripts from running indefinitely. If you see the error message, “Fatal error: Maximum execution time exceeded,” it means a task – like a plugin update, database export, or media upload – has exceeded the server’s time limit. Most hosting providers cap this at 30 to 60 seconds, but more demanding tasks often require additional time.
To address this, increasing the limit to 300 seconds usually solves the problem. You can make this change using wp-config.php, .htaccess, php.ini, or a plugin for a code-free approach. However, if the error persists beyond 300 seconds, it’s essential to dig deeper. Issues like poorly optimized plugins, oversized databases, or hosting constraints could be the real culprits. As the WordPress Developer Resources notes, balancing execution time with server load is key to maintaining stability.
Regular maintenance is vital. Tasks like cleaning up databases, reviewing plugins for efficiency, and keeping PHP up to date help ensure your site runs smoothly. Remember, max_execution_time works in tandem with other server settings, such as memory_limit and web server timeouts. Properly aligning these configurations ensures scripts execute without unnecessary interruptions.
FAQs
How do I check the current PHP max execution time in WordPress?
To find out the PHP max execution time for your WordPress site, you can use the phpinfo() function. Here’s how:
- Create a new PHP file and add the following code:
<?php phpinfo(); ?> - Upload this file to your server using an FTP client or your hosting file manager.
- Access the file through your browser (e.g.,
yourwebsite.com/yourfile.php).
In the output, look for the max_execution_time directive to see its current value.
If you’re not comfortable with this method, many hosting providers make it easier. For instance, control panels like cPanel often have a section for PHP Settings or Server Configuration. You can check these areas in your hosting dashboard to find the max execution time without needing to upload a file.
What happens if the PHP max execution time is set too high?
Setting the PHP max execution time too high can strain server resources, especially if inefficient or malicious scripts run for too long. This can lead to slower website performance, higher memory consumption, or even server crashes.
The key is finding the right balance: set a limit that’s long enough for legitimate processes to finish but short enough to prevent overloading your server.
Why doesn’t increasing the PHP max execution time always fix the issue?
If increasing the PHP max execution time doesn’t resolve your issue, it could be due to stricter limits set by the server’s configuration or hosting provider that override your adjustments. Another possibility is that the problem lies elsewhere, such as inefficient code, limited server resources, or other performance bottlenecks unrelated to execution time.
To tackle this, you might need to optimize your code, upgrade your hosting plan, or reach out to your hosting provider for help in pinpointing and fixing the underlying issue.